|
|
Steel reinforcement etc.
Generally speaking I ask that your engineer specifies 2 layers of A393 welded mesh in the slab and 2 in the walls as well.
The slab and the wall are connected, and the wall is prevented from being pushed over, by two rows of starter bars, 16mm or 12mm or one row of each depending on what they specify.
I want your steel tying to be as simple as possible, and I want your concrete to be completely protected from cracks.
That's why I explain what is likely to be specified and how and why I change it.
|
|
|
If you have been here before, I made big changes to this page on April 16th 2025.
In general, I want your steel to restrict crack widths in the waterproof concrete to what will autogenously heal. that means keeping crack widths really narrow, which many more cracks, but all will quickly heal.
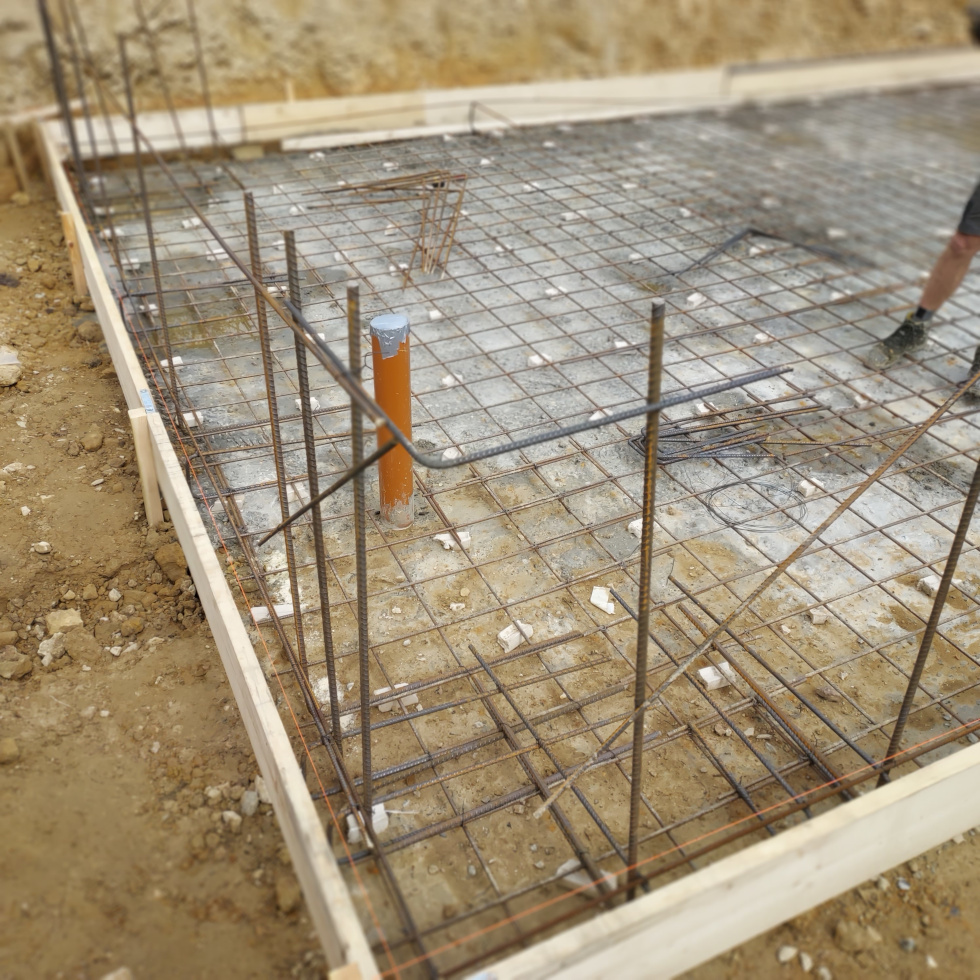
Also, Flying End welded steel mesh in the walls to allow the walls to be filled to almost 2m easily, with at least 400mm of steel sticking up to add more mesh or bars to the top.
And, I want it all to be very simple so that inexperienced people can fix all the steel easily. My simple walkway serves both pours.
Clients are increasingly buying cordless tying guns, like these. Note. Only Makitas seem to work. Cheaper brands constantly clog.
You might need to buy 50 rolls of the tying wire that fit inside these machines for £150. A lot more expensive than the £20 of wire you use to tie by hand.
But a self-builder will save many days of drudgery, as a result. It is better to be cheerful and making progress.
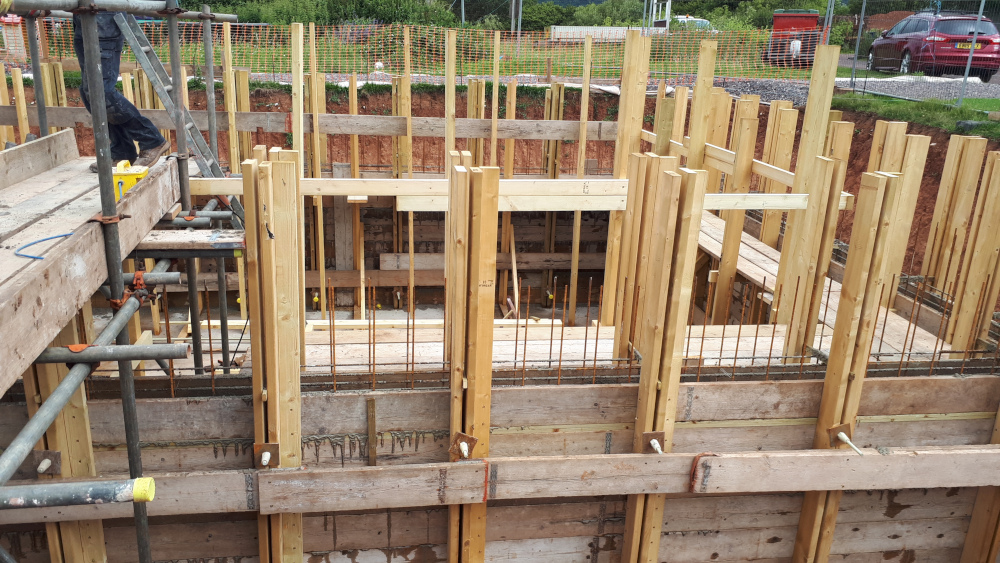
But in the typical arrangement of sheets of welded mesh and starter bars tied to the bottom layer, these machines don't get through the top mesh well enough. Machines don't work. If you have been here before, scroll down to shortly before the gold bordered text box.
|
|
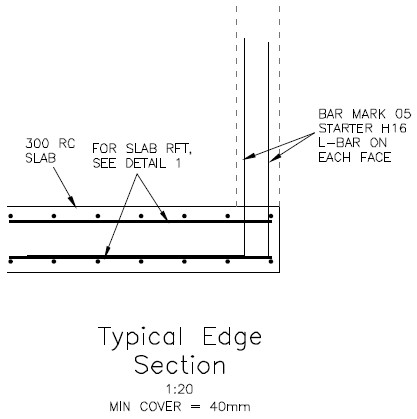
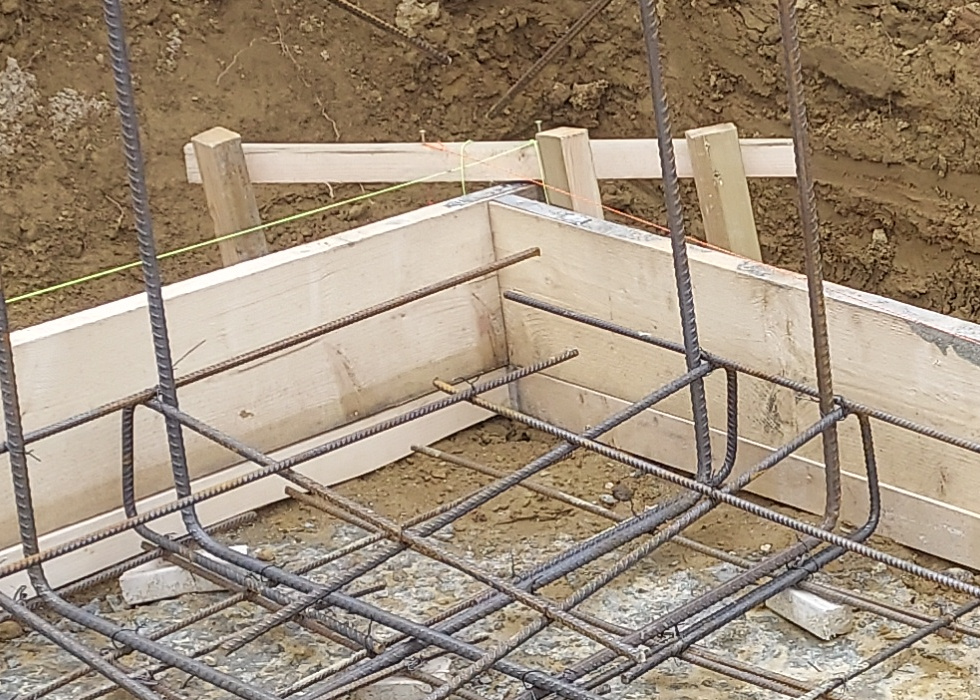
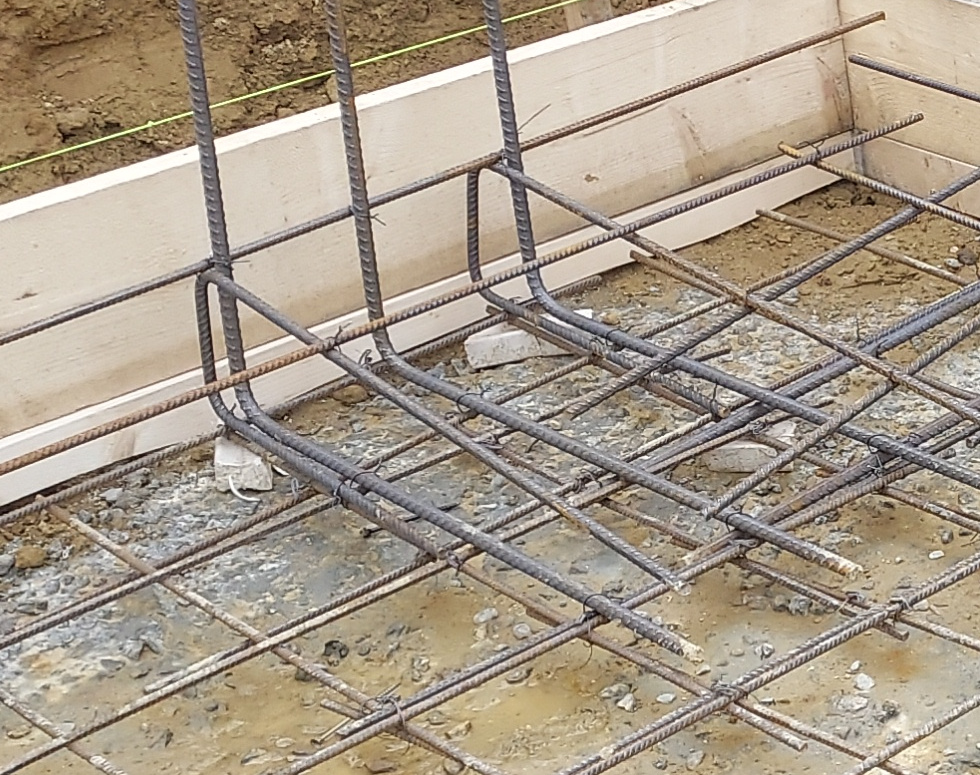
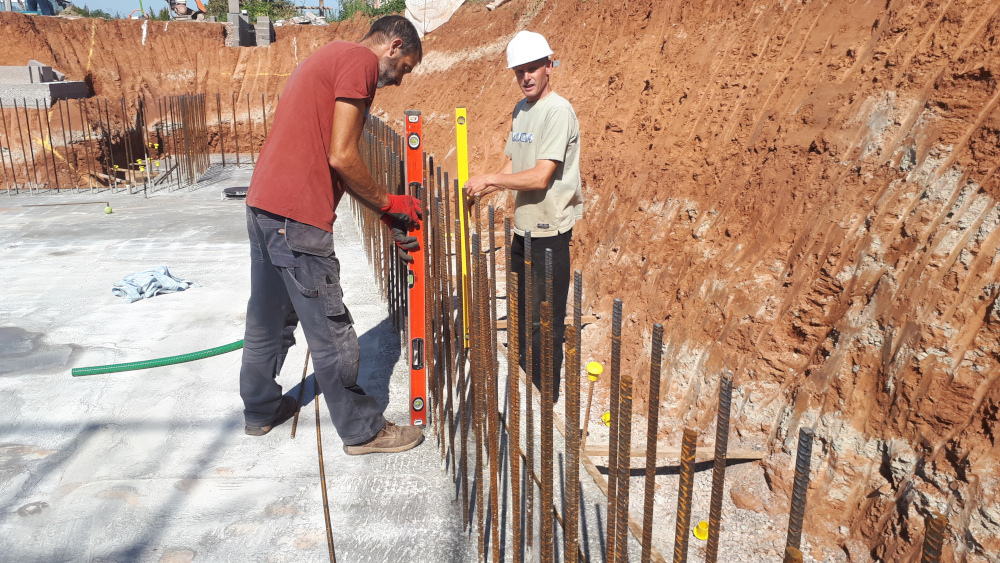
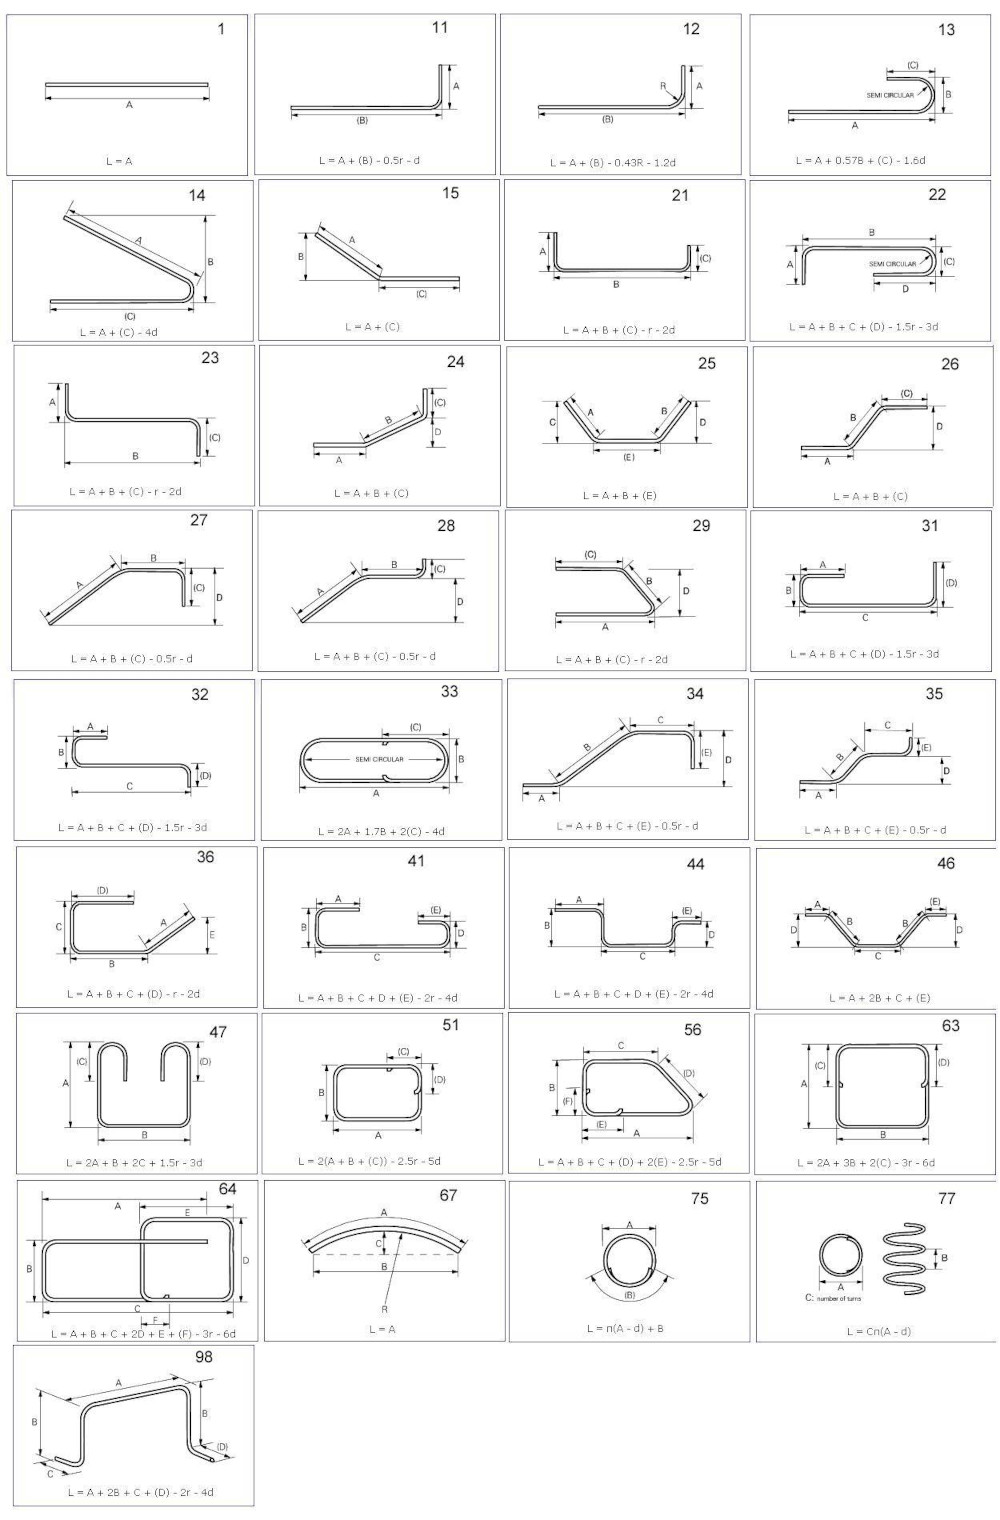
This engineer described starter bars as L shaped, which they are.
However, the correct terminology is 'shape code 11'
A straight bar is usually either 'shape code 00' or 'shape code 1'. All the shape codes are on a chart lower down.
If we accept that the lines and the dots represent welded A393 mesh, then the difficulties here are
-
The starter bars have to be tied to the lower layer of mesh while you are kneeling on very uncomfortable steel bars and reaching down through the top layer, lower than where you are kneeling, to do the tying.
-
Those two layers of mesh have to be separated. The top layer supported on 'things' the correct height and frequent enough. Those 'things' are a nuisance preventing the starter bars getting threaded into position correctly or easily.
-
The starter bars have to come out of the floor slab very accurately positioned to go up the wall with 40mm of concrete to the front face and 40mm of concrete to the far face.
|
When you get your final design, every different bar will have its own unique Bar Mark, or BM.
For example: on the bar bending schedule, BM1 H16 150 2000 11 600. Which would mean that all the BM1s are 16mm diam steel, there are 150 of them, each is 2000mm long, shape 11 so L shaped, and bent at 600mm (leaving a long side of 1400mm).
You need to find BM1 on the drawing to find out the spacing of these bars.
The drawing might say BM1 T16 32 200mm, meaning bar mark 1 is 16mm diameter, there are 32 to tie here, and on 200mm centres.
|
|
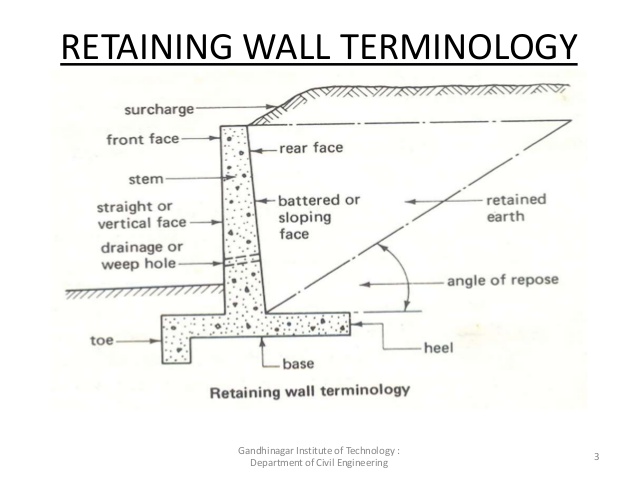
This isn't exactly a basement diagram. But you can see that the soil has been backfilled on the right. Imagine that the left is your basement floor slab.
Therefore, the heel may be on your design or it might not. If you have clay, you are likely to have a heel. If that wall is particularly heavy and the weight needs to be spread, you are likely to have a heel.
Even if you don't have a heel specified, an extra 50mm of concrete would give your wall formwork somewhere to sit, making life easier for you.
The toe will be your basement floor slab, continuing to the stem and any heel the other side.
Note that the side of the stem (basement wall) to your basement accommodation is the front face, or near face.
The other side of the stem, or basement wall, on the backfilled side is the rear face, or far face.
|
|
|
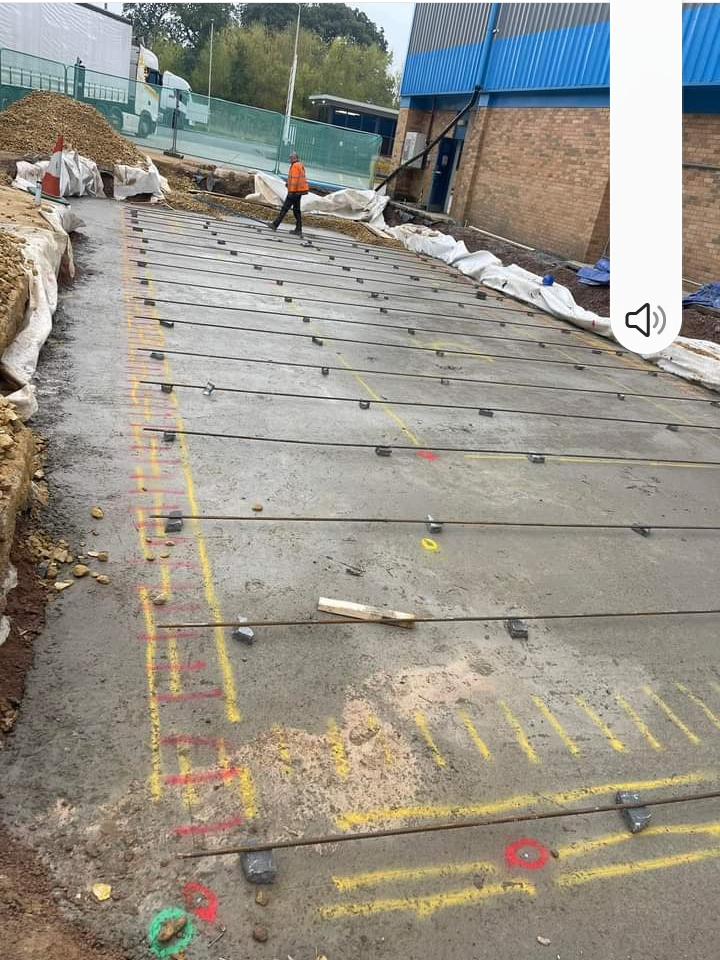
This photo popped up on facebook.
It is here because it is both simple and useful.
The little spacer blocks are accessories that your engineer won't specify. You need to know that you need to order them.
The concrete blinding is nice and flat and level. You won't waste more expensive waterproof concrete filling holes later. Neither will the spacer blocks sink when there is more weight and people walking over it as they pour the concrete.
And, because the blinding is neat, you can mark it up, should you wish.
We can see
-
A continuous yellow paint line representing the near face of the wall that will go on top of the floor slab after it is poured.
-
A dashed yellow line representing the far face of the wall concrete.
-
Another dashed yellow line representing where the starter bars need to be tied.
-
red lines representing every starter bar.
-
Accurately set nails for corners of concrete and starter bar lines.
Probably put there by the survey engineer who first drew up a topographical plan of the land, who you paid half a day to come back and set out.
|
|
|
Both these teams, both made up of experienced labour but who had never built a basement before, saved a bit of money not blinding with concrete all the way to where the walls would go.
That caused both their corner pins banged into the soil to move when they pulled their string lines tight.
That caused their starter bars to get tied in a curved line. Many were wrong and some were done again.
And their spacer blocks sank where they weren't on concrete, making their starter bars lean away from the vertical. They had to crank them with a scaffold pole and a lot of hard work.
Some walls had to be extra thick concrete to include the starter bars in the wrong place. Very wasteful of time and money.
|
|
|
Experienced labour are very good at not recognising that saving 5 minutes now costs an hour later. They 'bravely' say "that's fine, it won't take a moment". But it does take a moment. It takes a lot longer putting things right than it would have taken doing it right. Somehow, the client pays for their mistake.
Please don't be tempted to buy plastic stools, or wire spacers that come flat and get tied into a circle.
You might be far more sensible, driving pegs in the right place, concrete blinding the whole area include a few inches past your pegs to make them stronger, and accurate string lines representing outside of concrete walls. This client added 50mm to the slab to give his wall formwork something to sit on after this timber is all removed.
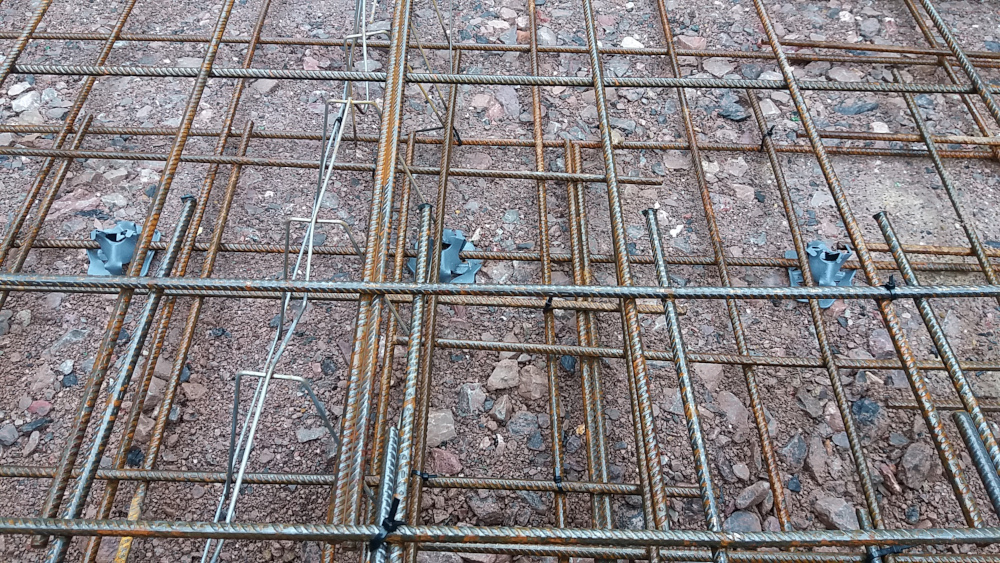
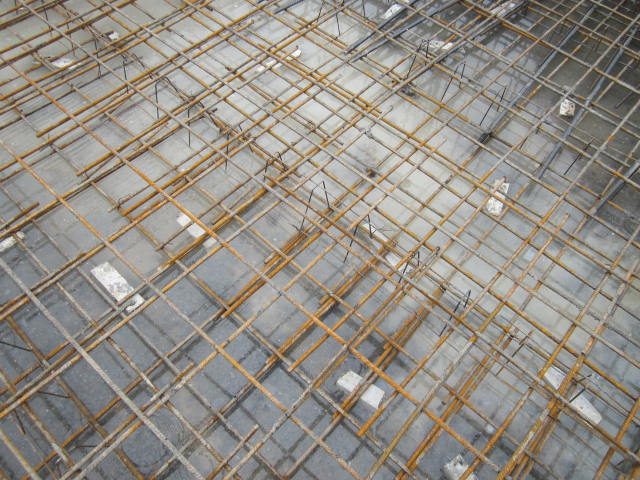
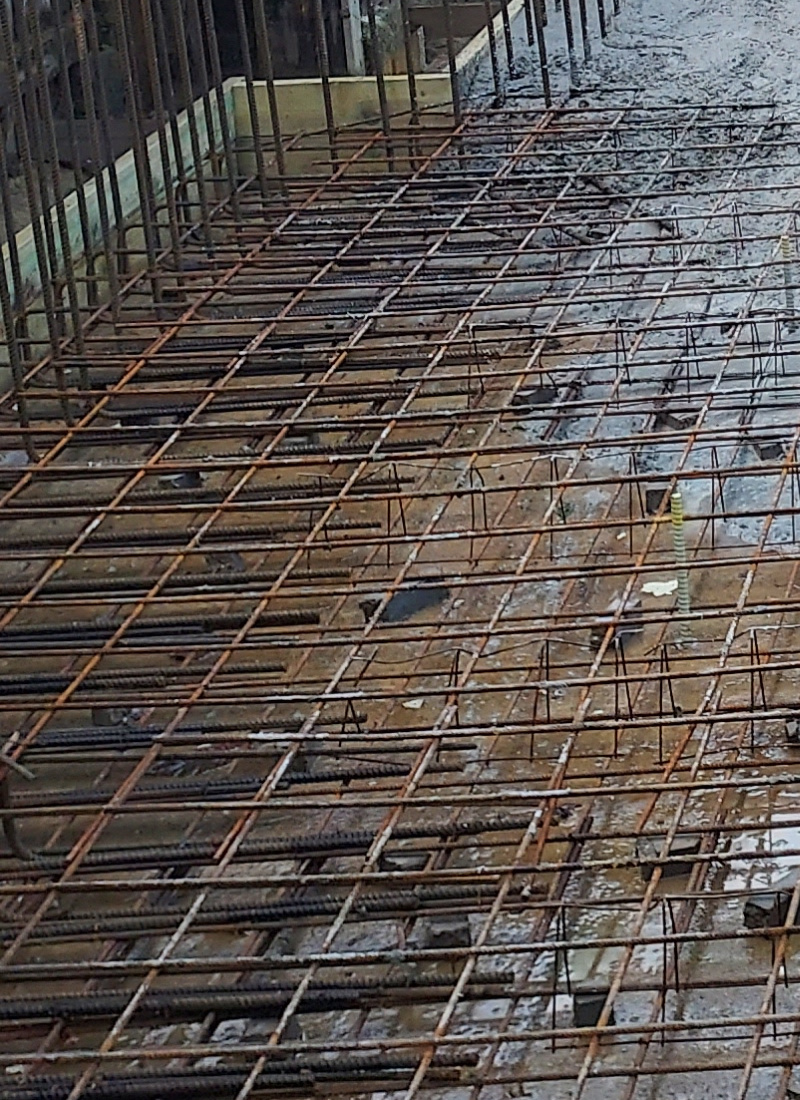
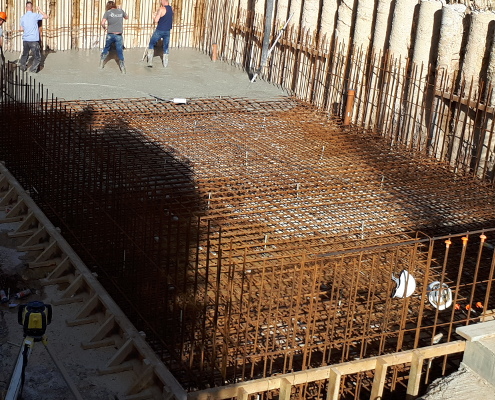
This photo is just two layers of mesh, starter bars, concrete spacer blocks and spacer continuous wire chairs.
Concrete spacer blocks are often nicknamed Mars bars. Continuous wire chairs like these are nicknamed Toblerones.
This photo is here as an example of the starter bars threaded through toblerones.
|
|
You can recognise the bottoms of the bent starter bars in this photo because they are less rusty than the mesh.
There is a lot of congestion to get them through. The worst is where they go through Toblerones.
Toblerones are tied on top of the bottom layer of mesh (either side every metre at least 300mm from the end of a toberone). Then the top layer of mesh is tied down to them once every metre.
You have to wriggle starter bars through the top mesh, sometimes through the toblerones, then tie them to a bar in the bottom.
It is extremely difficult to also tie them in a straight line where they need to come up through mesh and emerge from the floor slab concrete in the correct position inside the wall that you build next.
Please read on.
|
Some people avoid the difficulty of getting the outer starter bars down through the tiny gap between mesh and edge shutter by deliberately enlarging their floor slab to the edge of their excavation.
It does make getting the outer starter bars in easier,
but it also costs extra concrete and waterproofing admixture.
And the inner starter bars are still tangled in welded mesh.
If you tie your starter bars in before you put up your edge shutter, you will find it much more difficult to tie them correctly and in straight lines.
You will probably go back and cut some ties to move some of the bars.
|
|
|
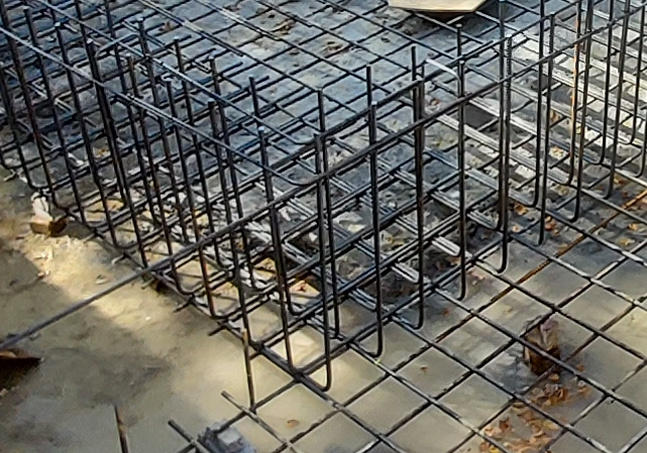
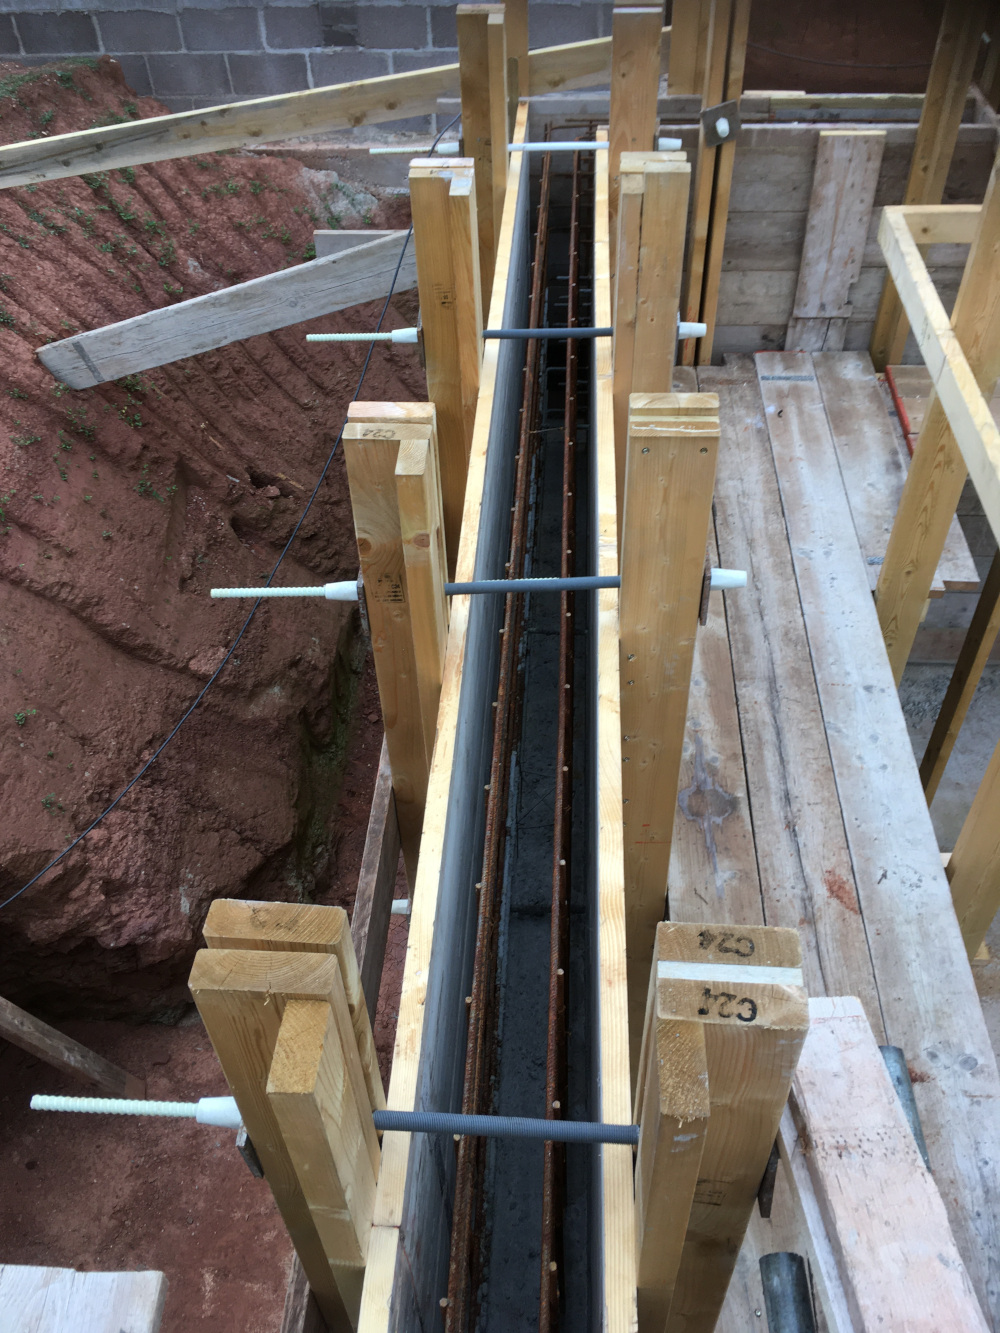
A few years ago, I made this job easier by laying the bottom mesh to the edge,
then U bars around the edge to keep the first wire toblerones far enough away to be out of the way of starter bars,
Then two lines of straight 10mm bar.
These 10mm bars are set and tied exactly where the starter bars tied to them will be exactly correct. A string line to set the 10mm bars then take the string away so no one trips over it any more.
The top of the U bar added to the 10mm straight bars have replaced the top layer of mesh under the wall. the extension of the U bar will overlap satisfactorily with the top layer of mesh when it arrives later.
Then, and only then, fix the starter bars.
You can see that you now have enough space to use the tying machine.
Recently, I specified the U bars to be 500mm long underneath to overlap with mesh already there, and 800mm long on top to overlap with the mesh yet to arrive. All 12mm diameter.
On a bending schedule, these U bars would be "1. Unique Bar Mark number; 2. H or T, type of steel; 3. Diameter, probably 12mm; 4. Total number (probably perimeter in m x 5); 5. Length of each bar - varies slightly with the height between layers of mesh; usually about 1470; 6. Shape code 21; 7. A is 800mm; 8. B is the height between top and bottom mesh, or slightly less to make corners easier. 9. Ignore C, the steel supplier will have 1470, less 800, less the height, and that will leave about 500mm which you want.
Bar mark 1 is the U bar, and bar mark 2 is a bundle of straight 10mm bar, which often come in handy.

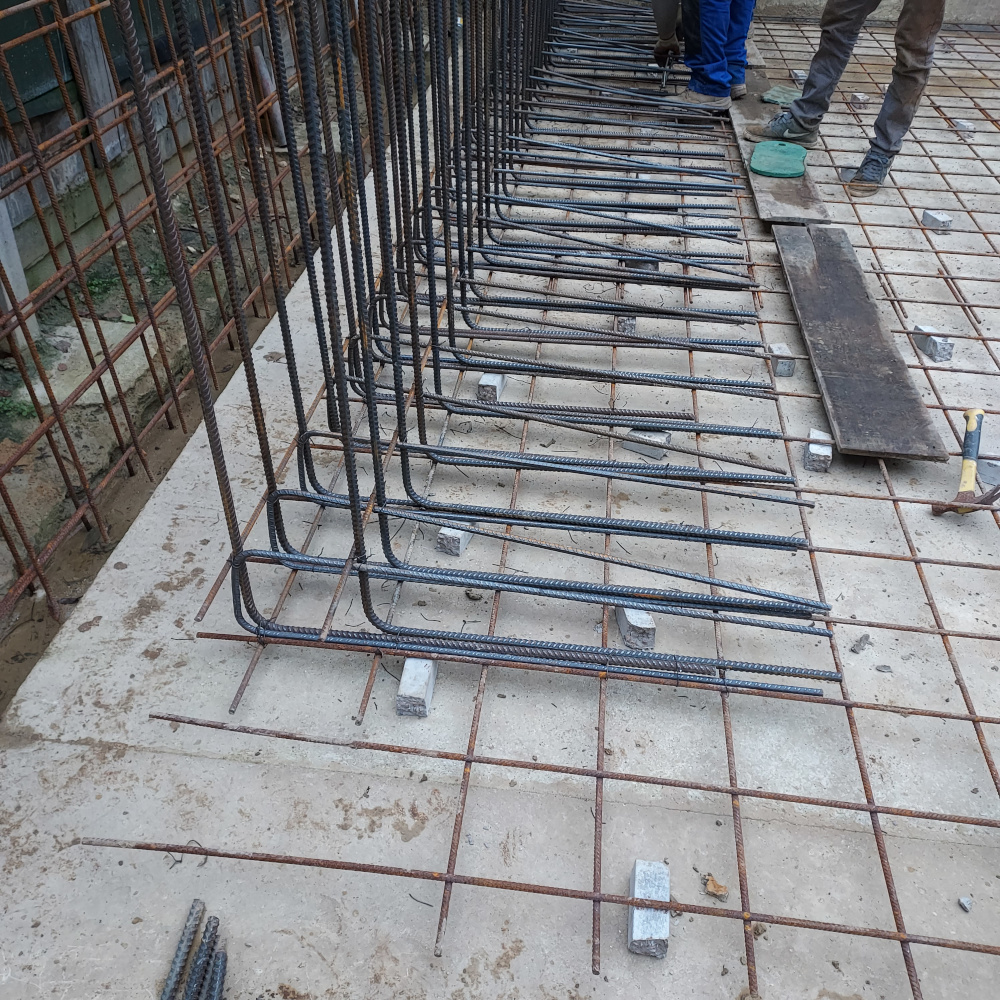
This photo is very much during setting up a corner. I prefer to tie my setup bars with tying wire from the rebar supplier and nips. Because I can tie tighter than a machine. Or, you can try tying with a machine then using pliers to make the tie a bit tighter.
Setting up corners needs to include a corner bar at the top. And diagonals, that need not be in the floor concrete when it arrives, as well. 3 pairs of hands can be helpful at this time.
Then a straight bar at the top connecting corners with a few starters along the way to prevent sagging.
The remainder of this wall steel can now be fixed by machine.
|
|
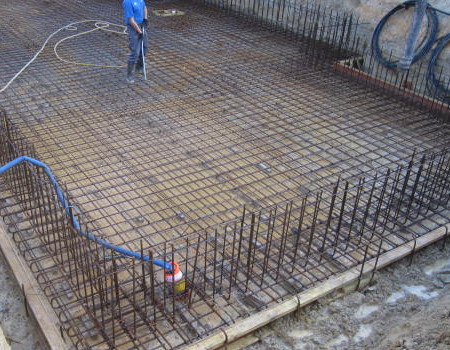
I use about 4 pieces of concrete spacer block per square metre, and I cut resin rod I glued in and cut to top of concrete as a visual guide when concreting.
If you look at where the mesh overlaps, about a quarter the way up the photo, because it is flying end it is neat and not wasteful of unnecessary steel.
Scaffold board used for edge formwork where it equals the slab depth required.
This formwork is supported by steel road form pins banged through the concrete blinding and the timber brought up to level with clods of earth underneath.
Bits of hardcore underneath would be better or include some wooden pegs and nail the board at the right height. If you can put your pins or pegs in correctly before you blind, the blinding will make them stronger.
The rebar should be clean before the concrete is poured. Here you see a compressed air line in use.
Round the edges it can be difficult keeping mud out. But all steel reinforcement must be clear for 40mm in every direction so that every bar is surrounded in concrete.
|
|
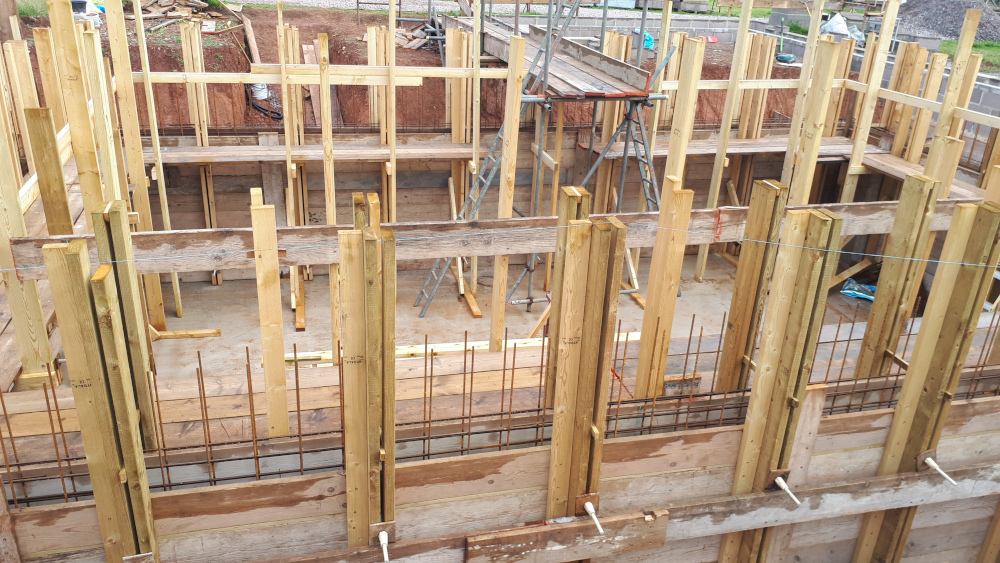
I recommend that the two faces of mesh in the wall are controlled by these U bars on 1.2m centres throughout. You should start fixing them and all the steel upright in the middle of a wall and work toward corners. Corners have L bars to join 2 walls together.
|
|
|
|
To get steel this straight along a wall you MUST, first, fix the two sides together, upright, in the middle about 1.2m from the floor. Then you work your way toward the corners with more U bars on 1.2m centres. Finally fix corners upright both sides after both walls have been plumbed.
If you don't add the U bars described above you cannot be this neat.
Professional steel fixers will argue till the end of the earth you never use these U bars and you CANNOT fix steel this upright or this neat. Impossible. Utterly unreasonable of you to expect them to do this.
Yet all my self build clients who fix their own steel do so this upright and this neat. Your formwork is a lot easier if you haven't got to use tonnes of force to bend curved wall steel to where you need it to be.
Yet all my self build clients who fix their own steel do so this upright and this It helps getting your wall steel neat if you plumb the starter bars first. They are very difficult to plumb later with mesh tied to them.
With the flying ends at the top, the topmost horizontal bar is 1.9m from the slab. If you cover this top bar with concrete, the concrete is not so deep that you cannot get the concrete to the bottom without hitting steel and spraying the slurry all over the inside of the formwork. if you did, then the bottom of the wall would have patches of just stones.
Build your formwork to 2m high and a smidge extra, and when you want to fill to 1.95m, you can fill to 2m and the vibrating poker will shake it down to 1.95m without losing any concrete over the edge.
You might have mesh to tie on afterwards to get you to the top, or you might tie on straight bars then horizontal bars to repeat the mesh and extra crack restriction bars to the top.
Note:
- There should be safety caps on all uprights to prevent anyone falling on them being punctured.
- A smooth blinding of semi dry or C20 very very wet concrete to virtually self level. Minimum 75mm thick.
- steel neat, clean and securely tied.
- Mesh supported on concrete spacers and chairs. (Links to some concreting accessory suppliers are at the bottom of the page).
One client sent me videos on Whatsapp to check he had fixed his steel as I had explained he should. You might find them useful.
They are 36 seconds, 15 seconds and 78 seconds long.
YouTube video rebar and formwork.
YouTube video rebar corner
YouTube video rebar wall
Your engineer is unlikely to specify your accessories. You need to order
- Concrete spacer bar.
Often called Mars Bars on site. These are 1m long and you break them up into pieces. I allow 0.4m per square metre.
- Continuous wire chairs.
Often called Toblerones on site. These go between the layers of mesh. Tie each chair down twice both sides. Then twice on top. I allow for continuous lines 800mm apart.
-
Tying wire. At only £18 a roll get extra. And, perhaps, get a cordless tying gun. The Makita works well. the others I have seen have all been rubbish, constantly blocking up. I don't rate potato sack wire because they snap. You need a roll of proper tying wire and proper nips where you need the tie to be very tight and strong. For instance, when you set up starter bars at corners.
There are some ways to make it a little easier.
|
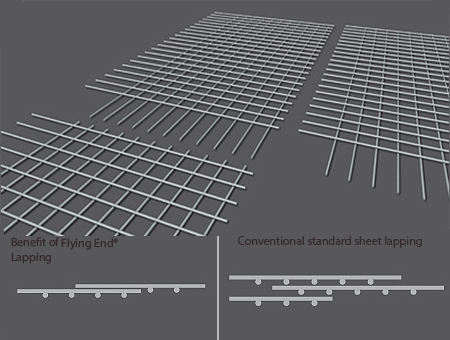
Flying End welded mesh.
Usually A393, which has 10mm bars in both directions on 200mm centres in both directions.
When you lap flying ends with a normal side you aren't wasting steel with identical bars side by side against each other, you aren't making a mountain at corners where 4 sheets need to overlap, and if you don't need full sheets down an edge you can plan to throw away the bit with 2 bars missing so less money thrown away.
(I took this image from www.brcmcmahon.com, a supplier in Ireland)
|
Note below:
- The rotating laser.
- One man using the laser detector properly, that is, upright.
- The vibrating poker.
- Goggles, gloves and steel toe-capped wellies in use.

|
and above the pale vertical rods. Top of which is top of concrete. These simple rods (cost £1.75 each) are on the slab levelling page.
|
I always fix walls with A393 mesh 4.8m along the wall and 2.4m high with the flying end tails upwards. Therefore, when I am filling and pokering concrete only 1.9m high the poker is not obstructed by horizontal bars 2.3m high. The work of concreting and pokering is easier. And I buy plenty of straight 10mm bar to fix to the top of the wall by hand, which is pretty easy with all the steel I'm fixing to already held firm in set concrete.
In case you want to order your steel yourself, (under Concrete Reinforcement in Yellow Pages)
you will need to know the language. Shape 1 is also known as shape 00.
British Standard preferred meshes in stock size sheets 4.8m long 2.4m wide.
| British
| Longitudinal Wires
| Cross Wires
| Mass
|
| Standard Reference
| Size mm
| Pitch mm
| Area mm²/m
| Size mm
| Pitch mm
| Area mm²/m
| kg/m²
| kg/sheet
|
|
Square Mesh Fabric
|
| A393
| 10
| 200
| 393
| 10
| 200
| 393
| 6.16
| 70.96
|
| A252
| 8
| 200
| 252
| 8
| 200
| 252
| 3.95
| 45.5
|
| A193
| 7
| 200
| 193
| 7
| 200
| 193
| 3.02
| 34.79
|
| A142
| 6
| 200
| 142
| 6
| 200
| 142
| 2.22
| 24.57
|
| A98
| 5
| 200
| 98
| 5
| 200
| 98
| 1.54
| 17.74
|
|
Structural Fabric
|
| B1131
| 12
| 100
| 1131
| 8
| 200
| 252
| 10.9
| 125.57
|
| B785
| 10
| 100
| 785
| 8
| 200
| 252
| 8.14
| 93.77
|
| B503
| 8
| 100
| 503
| 8
| 200
| 252
| 5.93
| 68.31
|
| B385
| 7
| 100
| 385
| 7
| 200
| 193
| 4.53
| 52.19
|
| B283
| 6
| 100
| 283
| 7
| 200
| 193
| 3.73
| 42.97
|
| B196
| 5
| 100
| 196
| 7
| 200
| 193
| 3.05
| 35.14
|
|
Long Mesh Fabric
|
| C785
| 10
| 100
| 785
| 6
| 400
| 70.8
| 6.72
| 77.41
|
| C636
| 9
| 100
| 636
| 6
| 400
| 70.8
| 5.55
| 63.94
|
| C503
| 8
| 100
| 503
| 5
| 400
| 49
| 4.34
| 50.00
|
| C385
| 7
| 100
| 385
| 5
| 400
| 49
| 3.41
| 39.28
|
| C283
| 6
| 100
| 283
| 5
| 400
| 49
| 2.61
| 30.07
|
|
Wrapping Fabric (basementexpert note: very thin)
|
| D49
| 2.5
| 100
| 49
| 2.5
| 100
| 49
| 0.77
| 8.87
|
Some engineers are fond of B1131.
Where I see it, I try to get it changed.
126kgs is too heavy to carry around walking on mud then treacherous mesh not tied down yet.
In one direction you have 1131 square mms of steel per metre. But in the other direction only 252. Many engineers who specify B1131 don't say which direction they want the stronger bars. I seriously think they don't know that B1131 is different one way to the other.
The 8mm wire in one direction is never enough to control cracking on its own.
If 12mm bars on 100mm centres are genuinely necessary - which I seriously doubt - then buy loose bar and mark the floor like in the photo at the top. Tie a few bottom bars as they have. Put the other bottom bars you need in between on the floor. Tie some top bars the other way. Pick the bottom bars up and tie them all to top bars. Tie the rest of the top bars.
You need a tie at least every 600mm. When you get the hang of what you are doing, make your ties along diagonal lines 600mm apart.
| Size
| 6mm
| 8mm
| 10mm
| 12mm
| 16mm
| 20mm
| 25mm
| 32mm
| 40mm
|
| Area (mm²)
| 28.3
| 50.3
| 78.5
| 113.1
| 201.1
| 314.2
| 490.9
| 804.2
| 1256.6
|
| Weight kg per m
| 0.222
| 0.395
| 0.616
| 0.888
| 1.579
| 2.466
| 3.854
| 6.313
| 9.864
|
| Approx no. of 12m bars per tonne
| 375
| 211
| 135
| 94
| 53
| 34
| 22
| 13
| 8
|
Links
Major reinforcing suppliers are
Hy-Ten
BRC
Rainham Steel
Steel Reinforcement Suppliers
AND
Express Reinforcements have been bought by 7-Steel. Their website doesn't seem useful, apart from stressing they recycle and burn electricity not coal. I did not find an email address, so perhaps phone first 029 2035 1800.
Accessories suppliers are
"Buildspan - the concreters warehouse"
Speedcrete
Max Frank
Lemon Groundworks
Formwork Direct
Siteright Construction Materials
Back to the Basement Building Questions Answered menu.
|
Back to the Basement Building Construction Manual menu.
|
For a fixed fee of £199 I will answer all your questions by email. More details here.

|
|
|
| |